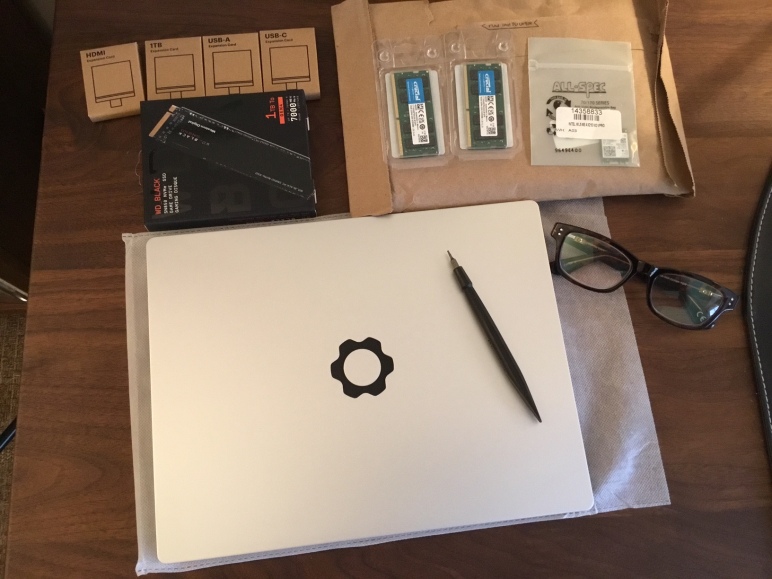
I got a Batch 6 Framework DIY Edition Laptop, to use as a portable Linux machine. I like it a lot; you might too. This post describes my expectations and impressions, the Gnome tweaks I made for usability, plus some benchmarks. The pic shows what’s in the box (clockwise from top left): four expansion cards, an SSD stick, two RAM sticks, a WiFi card, the laptop chassis, and the combo tool.
Framework laptops are designed to be easy to upgrade, and to respect your right to repair. From the what’s-in-it-for-me point of view, this benefits owners by enabling them to fix and improve their laptops over time, with bigger and faster RAM and SSDs, and standards-based connectors and cables. But the broader public benefit is even more important; there is no better way to push back on the “end of ownership” than by supporting vendors that support the right to repair. So the ideals are great, but how is the hardware? Pretty good.
Expectations
My expectations are set by my background. I use an Apple PowerBook at work, and an iPad and iMac at home, along with an Intel NUC that I use with an Apple keyboard and mouse. Despite all of the hardware designed in Cupertino, CA, I have been a die-hard Linux user since 1995, when I installed Slackware from the disk that came in first edition of Linux Unleashed. While I mostly use Ubuntu now, I spent years hand-editing partition tables and XFree86Config files, and I expect and am comfortable with some amount of post-install tweaking. I use the Apple keyboard because it’s good, but also because my fingers are used to it. In recent years, I have spent a lot of time running Linux as a guest OS inside of Fusion or VirtualBox, which is great, except when it isn’t. I’m an Emacs user, which means that I care a lot about having a Meta key close to my left thumb.
Impressions
I use my Framework as a portable, dedicated Linux machine, and it has been a welcome replacement to using the iPad as an SSH client. The display is great, the backlit keyboard is very comfortable, and the materials are quite nice. This includes the aluminum chassis, the power brick and USB-C power line, and the general fit and finish. As a long-time Apple user, I have high expectations around materials, fit, and finish, and the Framework met all of them. Especially nice: the power brick is small, and both the AC cable and DC cable have attached velcro wraps, and are made well. The overall reach is slightly longer than that of a recent MacBook Pro charger.
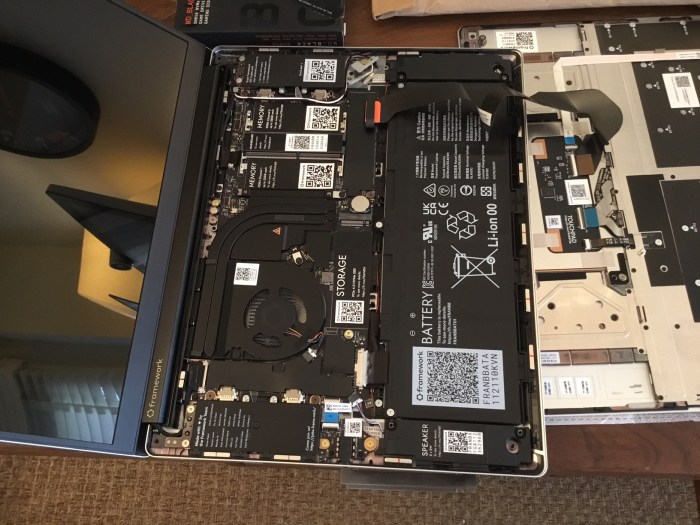
Installing the RAM, SSD, and WiFi card was quick and easy. If you have ever done this for another laptop, you will relish the experience on the Framework, where components are labeled and accessible and are not fettered by crisscrossed gossamer ribbon cables and wires attached by ridiculously delicate connectors. The pic below shows my Framework’s interior, after the components went in. Make sure to read the instructions before you remove the keyboard; it’s simple, but it might not be obvious that you only have to loosen the screws on the bottom, then the keyboard pops off.
With a Framework, you get to choose what ports your laptop has, through the very cool idea of expansion cards that fit into the four slots. I selected cards USB-A, USB-C, and HDMI ports, and a 1TB flash drive. I plan to buy another USB-C, because the power cable occupies one of those slots. I like the flexibility of these cards, though removing a card is fiddly enough that I would not want to do it as part of a regular workflow (the way some people use USB flash drives or SD cards) is not too fiddly. I decided to give it a try, and with familiarity it is as easy as a USB slot (Updated Jan 30, 2022).
For Linux, the Framework people advise to run Ubuntu 21. It installed without any trouble. If you are new to Ubuntu, you will need to check out their download and install instructions. While I’ve been running Ubuntu Desktop version 21 on Raspberry Pi 4 (it’s excellent, try it!) and never had to fiddle with the Gnome settings on that hardware, some tweaks were needed on the Framework.
Gnome Tweaks
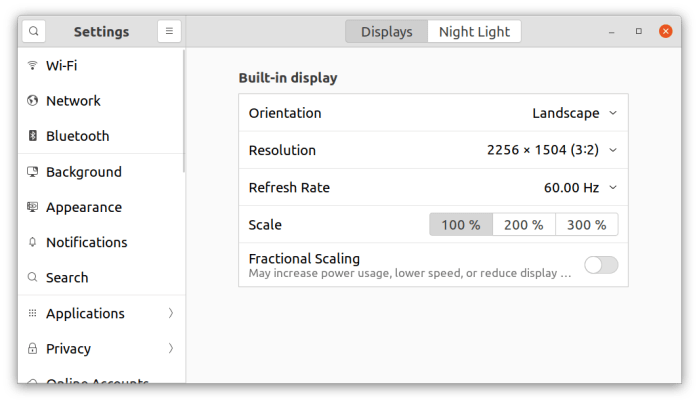
Post-install, Gnome was running with the display scaled to 200%, which made all of the icons and windows look big and awkward, and the screen look quite cramped. Perhaps the Framework’s 2256 x 1504 display was big enough to trigger a scaling larger than 100%? The fix was easy: change the scaling to 100% in Settings, in the Displays tab, as below.
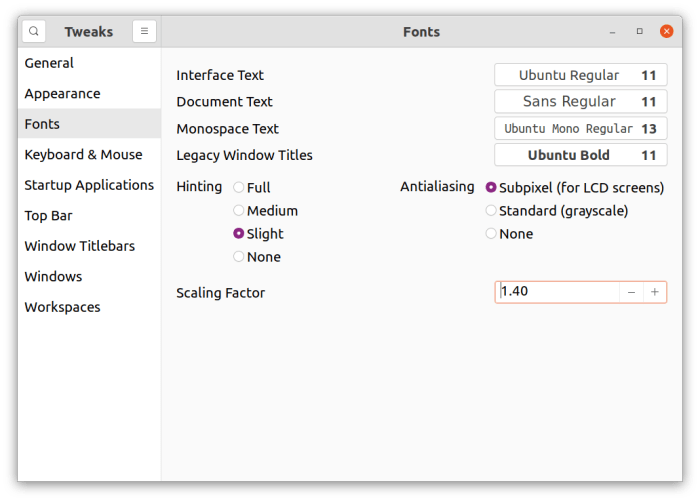
One that was done, I had to change the system font sizes to make them large enough to be legible. That required running sudo apt install gnome-tweaks, and then changing the font scaling factor in the Fonts tab of the Tweaks tool, as shown below. Ubuntu 21 uses Gnome version 40; this tool is the updated version of gnome-tweak-tool. Changing the scaling factor relieves you of the need to fiddle with individual font sizes.
I also used Tweaks to adjust the trackpad, on the Keyboard and Mouse tab.
The Framework keyboard and trackpad took me some time to get used to. My finger memory was all wrong, because I was used to Apple’s (fn, ctrl, opt, alt) layout instead of Microsoft’s (ctrl, fn, opt, alt) layout. Of course, these issues are not the fault of the Framework. I also wouldn’t mind a screen with more square inches of real estate. It’s size and heft are ideal for travel, but I’m used to a slightly larger screen.
Benchmarks
To quantify performance, I ran some quick benchmarks on the SSD and the 1TB expansion card, using the Gnome Disks utility (open Disks, select the drive you want to test, then select ‘Benchmark Disk’ from the Drive Options pull down menu, which is accessed by clicking on the button with three vertical dots on it). For comparison’s sake, I also ran the same tests on an Ubuntu 21.04 guest OS running on top of VMWare Fusion 12.2 Professional on a 2019 MacBook Pro 16,1 laptop running MacOS 12.1 as the host OS. The Framework easily bested the virtual setup; details below:
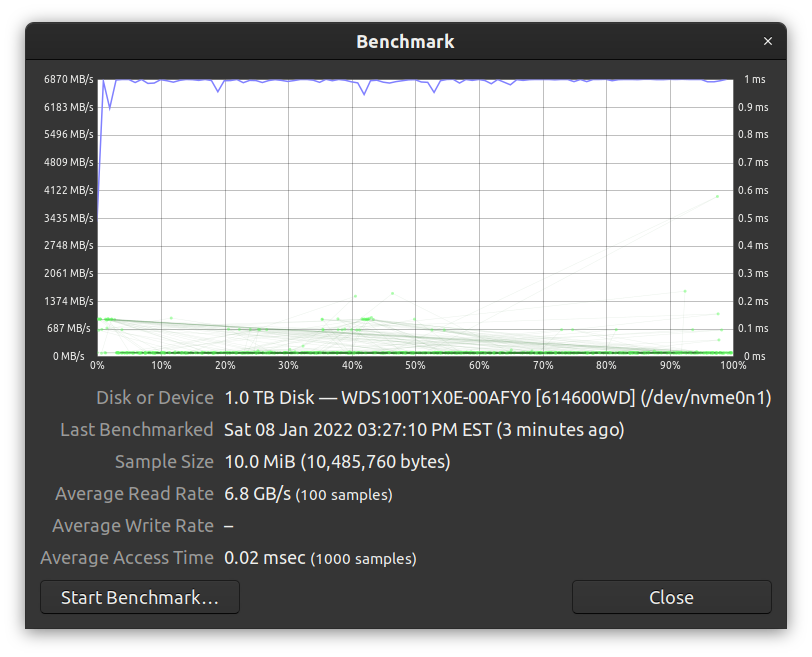
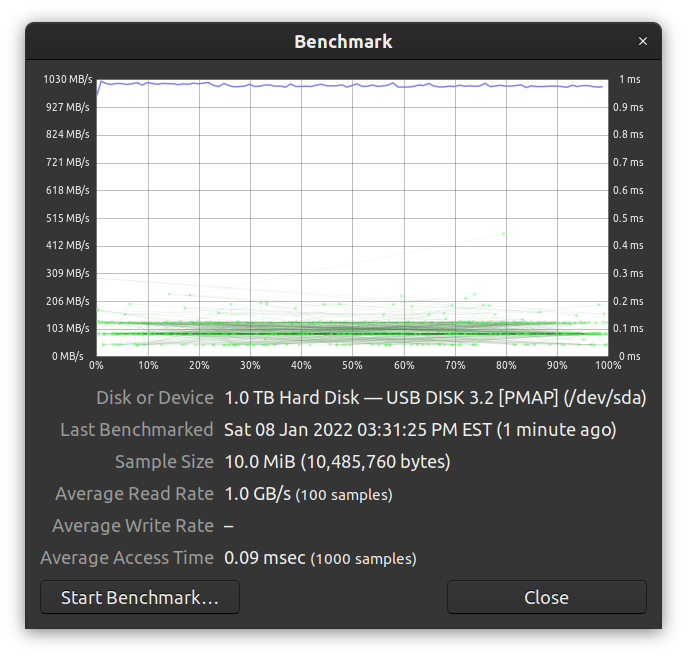
| Disk | Average Read Rate |
| Framework 1TB WDS100T | 6.8 GB /sec |
| Framework 1TB USB 3.2 Expansion Card | 1.0 GB /sec |
| Framework Samsung SSD 860 EVO SATA USB | 447 MB / sec |
| Fusion/MacBook VMWare Virtual Disk | 4.8 GB / sec |
| Fusion/MacBook Samsung SSD 860 EVO SATA USB | 381 MB /sec |
Conclusions
So far, I’ve used the laptop for several weeks, including one week of travel, and I’m pleased with it. I used it for C++ development, some data analysis scripting, Latex, and web browsing with Firefox. The laptop feels light, does not get too hot, and seems to have good battery life. If you are looking for some nice hardware to run Linux, definitely check it out.
Disclaimer: I have no business relationship with any of the corporations or organizations mentioned above.
Copyright © 2022 David McGrew.
